Table of Content
- Introduction
- Hardware
- Assembly
- Software installation
- Software configuration
- Installing a firewall
- Evaluation (audio)
Introduction
Around 2009 I started to stream audio, first with a Logitech Squeezebox Duet, later upgraded to a Touch. The process is described here on these pages and it is still a popular source of information. Whereas the Duet is "headless" the Touch has a head (a touch display for output and input) and between the two, I totally prefer a device with a head.
Recently my Squeezebox Touch died, and I found that it was probably just the power supply. Anyway, it was a good "excuse" for upgrading - something I've thought about on-and-off for a long time - with a DIY Squeezebox, based on a Raspberry Pi. In my opinion the Duet isn't a good source and only acceptably suitable for background music.
I found it impossible to collect all the pieces of information needed before executing the Raspberry Pi project, so I gave up and I ended up purchasing parts in bits and pieces, examining the incoming goods and then deciding what else to get. Unfortunately, it was equally difficult to find the cheapest option, including the consideration of shipping cost (head under arm ...). I hope that this description can help others to be able to organize their purchase and process in a smoother manner.
Hardware
I researched what to buy, incl. DAC board to buy and how to set it up. This process went remarkably fast, maybe because I've eyeballed at it several times in the past, but as mentioned I simply gave up on figuring out all the details before purchase. I went for the latest Raspberry Pi 3 Model B+ and the official Raspberry 7 inch Touch display. I gave serious thoughts to buying a larger screen with HDMI input, but defaulted on the official display. The older DIY web pages describe how to use a SmartPi case, but I find it to be ugly, and instead went for the DesignSpark case. I am well aware the DAC module cannot fit into the case and I'll have to drill holes and either remove the back plate or maybe extend the case myself. A bit like what the people at Instructables do. Read on to find out how it goes.
![]() A new DAC design by Orchard Audio / Leonid (Leo) Ayzenshtat, named the
ApplePi DAC was chosen.
Not exactly cheap, but it boasts of being the best available. I added
the Volume-Clocker board as well, and the Stacking Header + the 3 Ampere
power supply, and also the mini-XLR (female) to XLR (male) converters.
In other words, everything Orchard Audio has to offer for the Raspberry
Pi. The stacking header can probably be found cheaper elsewhere but I
didn't bother to research it, whereas I looked around for an equivalent
power supply (for European Schuko outlets) with no luck. The life of ApplePi
started here at
kickstarter
and in the diyaudio forum.
A new DAC design by Orchard Audio / Leonid (Leo) Ayzenshtat, named the
ApplePi DAC was chosen.
Not exactly cheap, but it boasts of being the best available. I added
the Volume-Clocker board as well, and the Stacking Header + the 3 Ampere
power supply, and also the mini-XLR (female) to XLR (male) converters.
In other words, everything Orchard Audio has to offer for the Raspberry
Pi. The stacking header can probably be found cheaper elsewhere but I
didn't bother to research it, whereas I looked around for an equivalent
power supply (for European Schuko outlets) with no luck. The life of ApplePi
started here at
kickstarter
and in the diyaudio forum.
Orchard Audio offered on kickstarter this frame (case without a rear protection), so there's guaranteed room for everything without the need to modify anything. Same product, but sold through Pimoroni. I'd like a bit more protection of the electronics and the DesignSpark case offers this.
The ApplePi sounds to me like a well implemented product, from power supply over digital to analog stages. The analog stage is implemented with a better S/N ratio than the official datasheet for the DACs by using TI OPA1612 ultra low noise op amps. The DAC uses two Burr Brown 1794A DACs in Monaural mode, an old favorite of mine. It's not the newest DAC available, maybe from around the turn of the century and could be considered a bit dated, but it was well designed both in regard to sound quality as well as technical specifications. It "only" supports 16 and 24 bit resolution, and sample frequencies up to 192 kHz, i.e. "standard" high-res, but it's probably good enough. Regarding High-Res Audio, my personal opinion is that 96 kHz suffice, and that implementation is much more important, in particular in the audible passband, rather than what is happening at ultrasonic frequencies. I think ApplePi was designed and implemented well, and there's not multiple generations with sequentially better implementation. This one was done well from the beginning, so it looks like the designer knows what he's doing.
You can probably choose a different DAC board and still follow in my footsteps. I think it is up to you, which DAC board you wish to use, and by all means, if you urge for 32 bit and 384 kHz (or higher), feel free to do so. I hope the description here of my process will still be of inspiration to you.
The ApplePi DAC is without any kind of fancy stuff. There's no automatic upconversion from lower bit or lower sample rates to higher ones - if you feed the DAC a 16 bit and 44.1 kHz signal, that's what you're getting. There's no user selectable filters to choose from, the chosen filter is steep and provides a linear frequency response well beyond 20 kHz. There's no explicit headroom for intersample overs, in other words there's no gain reduction to make room for intersample clipping correction.
When you buy the Volume-Clocker, it includes a Burr-Brown SRC4193 sample rate converter, which uses an internal 28 bit data-path, which allows for volume control without raising the noise floor. Since the DAC achieves an equivalent of 21.33 bits of resolution (128dB SNR), volume reduction up to 40dB or 6.67 bits will not affect resolution. (Essentially 1 bit is equivalent to 6dB)
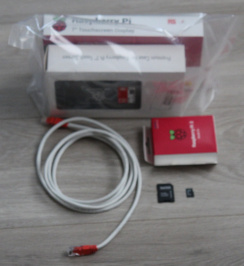
The Raspberry Pi and the DesignSpark case, etc. arrived before the ApplePi gear (shipped USPS from New Jersey), so I put it together and just connected it to my Hi-Fi equipment with the Raspberry Pi mini-jack output. It doesn't sound good, but it allowed me to play around with the equipment and settings in advance. It's very easy to put together and with prior experience it takes 5-10 minutes. For a novice like myself, including the software part, reserve 30-40 minutes. See below about software installation.
Hardware list:
- Raspberry Pi 3 Model B+
- Raspberry Pi 7 inch Touch Display
- DesignSpark Case (black - available in white as well)
- A 1 GB microSD card + the SD-microSD adapter (that I found in a drawer)
- Ethernet Cable (found in a drawer)
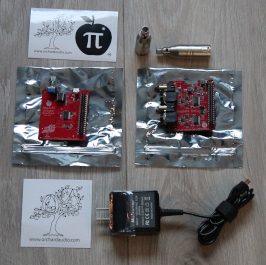
- Orchard ApplePi DAC board
- Orchard ApplePi Volume-Clocker
- Orchard Stacking Header - needed to extend the GPIO so I can put the DAC on top of the Volume-Clocker and connect the display
- Orchard 5.25 V, 3 A (15 Watt) power supply with micro-USB plug
- Orchard mini-XLR female to XLR male adapters (2 pcs)
- Travel Adapter from US equipment to European (Schuko) mains (found in a drawer) is needed because the power supply from Orchard are with the two flat pins used in the US.
- 4 x M2.5 x 12mm Standoff (Hex male-female)
- 4 x M2.5 x 14mm Standoff (Hex male-female)
- 4 x M2.5 Screws
Please note: Orchard Audio is not specific about what standoffs you need, because it depends on what you're doing with it. Leo clearly writes 12 mm standoffs, and it's correct, and the video online shows female-female standoffs when assembled to a headless unit. This is not correct in our situation because we're attaching this to a display, and you will need the male-female version.
 Buying the ApplePi from Leo was a positive experience. Leo was quick at
responding to questions. When I ordered the products on the 29.
November, it went into the mail (USPS) the same day. On the 1. December
I could track the package at the USPS center in New York, ready to go
overseas. On the 4. December the package was tracked in Oslo, Norway.
Ten days later I received a delivery notice with the specification of
the pick-up place. Here's a video (66 MB
download) of me unpacking the box - sorry about the bad quality,
it's my first video of this kind.
Buying the ApplePi from Leo was a positive experience. Leo was quick at
responding to questions. When I ordered the products on the 29.
November, it went into the mail (USPS) the same day. On the 1. December
I could track the package at the USPS center in New York, ready to go
overseas. On the 4. December the package was tracked in Oslo, Norway.
Ten days later I received a delivery notice with the specification of
the pick-up place. Here's a video (66 MB
download) of me unpacking the box - sorry about the bad quality,
it's my first video of this kind.
Errata: In the video I say the Sample Rate Converter upconverts the sample rate, and indeed it could in principle upsample the signal, but in this particular implementation by Orchard Audio, the sample rate is left as is. The SRC4193 is used just for volume control and jitter reduction. You can upsample with much higher quality using the power of the Raspberry Pi, please see below about upsampling.
I am not impressed by the Norwegian postal service, Posten (tracker). The package from Orchard Audio was transported in 5 days (including the weekend) the distance from New York to Oslo, 6000 km (3700 miles). I live about 70 km (43 miles) from the Posten Sorting Central (with Customs), Akershus, yet it took 8 work days + another weekend for the package to go through customs and arrive in my hands. Anyway, we cannot blame anybody but the Norwegians for their inefficiency.
The ApplePi comes with Tini-QG (TQG) mini-XLR outputs, which doubles the signal level out and has better specifications, so it's desirable to use these. To take advantage of this feature, you'll need either the adapters from Orchard + some XLR cable, or some mini-XLR cable (meaning cable with mini-XLR connector, at least in one end). As you know, I ordered the TQG-XLR converters from Orchard Audio, but after assembly found that these would be pointing up out the top, which I find to be not so practical. Besides, I'm afraid if it weighs too much, gravity will over time stress the ApplePi board and the connection (maybe the solder joint to the board) will eventually fail.
Reliability is a joker, when you build a product like this yourself. One should think about reliability, not least how you put it together, and if you can support it with some structure. In general, don't forget that during assembly you're handling a piece of "naked" electronics, so be careful with it.
I found that my own amplifier degrades the quality significantly when using balanced input, so I am using the RCA outputs from the ApplePi DAC - I'm glad the DAC offers both options. If you have a nice balanced input on your amplifier, here's the recipe I had planned (but chose to cancel): I recommend you order some tailor made cables, e.g. from Audiosense, which uses at one end the Cable Techniques LPS-TA3F-180 conncetors, and at the other end some standard Neutrik 3-pin male XLR connector. The cable they use is a suitable high-quality microphone cable from Ambient Recording GmbH in Germany (who get it from LEONI/Perivox). This cable is fairly thin and fits the connectors from Cable Techniques. The price they quoted for me is 64 EUR for two cables (complete with connectors) + 35 EUR shipping (+ 20 EUR VAT). This means the cable is actually a fairly expensive part of the total solution. It could probably be made cheaper if you decide to do the purchasing in bits and pieces and solder it yourself.
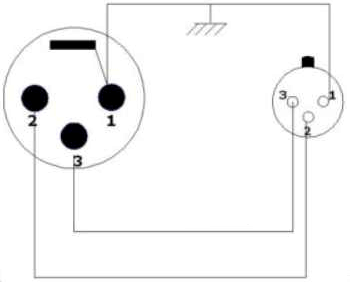 Please notice that the pins must be connected at both ends (all three of
them), to obtain the best signal to noise ratio in the system. The pins
are basically connected as pin-1 to pin-1, 2-to-2 and 3-to-3, following
the numbers. Please notice that their layout is a bit different in the
two types of connectors, as shown in the pin assignment sketch.
Please notice that the pins must be connected at both ends (all three of
them), to obtain the best signal to noise ratio in the system. The pins
are basically connected as pin-1 to pin-1, 2-to-2 and 3-to-3, following
the numbers. Please notice that their layout is a bit different in the
two types of connectors, as shown in the pin assignment sketch.
The micro-SD slot in the Raspberry Pi is covered by the ribbon cable for the Touch Display, which makes it difficult to access the micro-SD slot on the Pi. Furthermore, the entire thing is hidden inside the display case and then becomes totally inaccessible. In this design, the card is not accessible, it requires disassembly of the system, and therefore it's a hassle to get to it. Just letting you know, this is the trade-off I choose because I wish for the electronics to be a bit more protected.
For buying Raspberry Pi equipment, there seems to be a number of different standard resellers, like RS Components (Radio Shack) as well as Farnell (element14) are active resellers worldwide, but also alternatives like Pimoroni and The Pi Hut are worth taking a look at.
Purchase cost, including import to Norway from the US of the ApplePi and all the different shipping cost etc. is at a grand total of 5065.67 Norwegian Kroner (about 520 EUR, 590 USD, 3900 Danish Kroner with exchange rates mid December 2018). Add the 120 EUR for the cable.
Assembly
The Raspberry Pi, Touch Display and DesignSpark Case came with all the necessary hardware. You just need the tools; some suitable (Phillips head) screwdrivers.
The Touch display doesn't come with instructions, and so this is something you'll have to look up on the internet. My Touch display already had the controller board mounted, but some instructions shows that they come (or in the past came?) with the parts separately. How to install the Touch Display: YouTube video #1 and YouTube video #2. I like the first video, although not related to audio and a bit long, it shows clearly how to connect each cable between the display and the RPi (look at 4-5 minutes into the video).
The Orchard Audio gear comes with none of the necessary hardware, as it is clearly stated on the web pages. I wish that Leo would change this, so that the bits and pieces (like the 12 mm and 14 mm stands-offs) are included in the package, or can be added at additional cost. Ultimately, this decision depends on who is the target customer for Orchard Audio. If the target is someone tinkering with Raspberry Pi's and Arduino boards, chances are you already have stuff like this floating around in a drawer somewhere. On the other hand, if the target is an audiophile (like myself), potentially someone who has never played around with any of this before, and may also not play around with electronics in the future (it's a one-time experience), then we don't have such materials readily at hand. It can cost quite a bit to find these parts and have them shipped (in very small quantities). Shipping is more expensive than the parts, but I do understand that there's a plethora of options and a small supplier like Orchard Audio might not wish to have many of these options readily available (unless, as I indicate, it creates additional sales). An alternative option could be that Orchard Audio sketches a few options on their web site and points to sources where the needed parts can be purchased in Europe and the US (e.g. direct links to Amazon and/or Farnell). You could also try to ask (negotiate a deal) with Leo and hear if he'll add some stand-offs for free (I cannot guarantee that he will do it, I purchased mine from Farnell).
 With the case from DesignSpark, the Display and the Raspberry Pi are
mounted together and put into the case from the front side, then the
parts are screwed together. The Volume-Clocker has to come in from the
back side. Finally, the DAC board is also mounted from the back and it
stays outside the case.
With the case from DesignSpark, the Display and the Raspberry Pi are
mounted together and put into the case from the front side, then the
parts are screwed together. The Volume-Clocker has to come in from the
back side. Finally, the DAC board is also mounted from the back and it
stays outside the case.
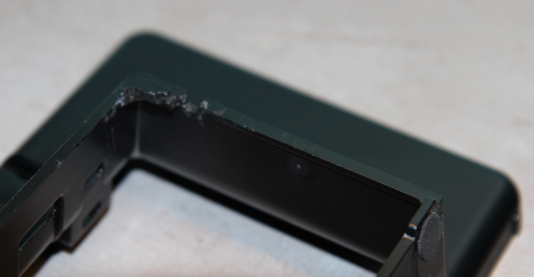
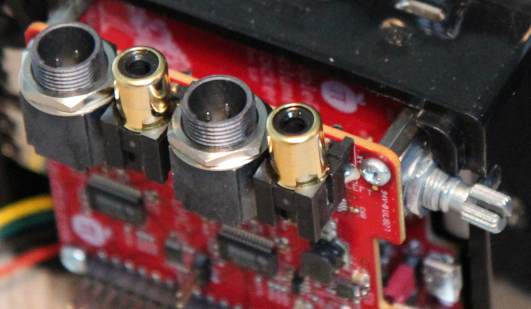 To make room for the Volume-Clocker, you need to modify the case by
removing most of one corner. See the photos for details. I drilled a
hole first, to make room for the potmeter axle, but I don't recommend to
do this. It's impossible since you're trying to drill less than half a
hole - you know what I mean? A Dremel and a Stanley knife will do the
job, and maybe a small hand file to polish the cuts a bit.
To make room for the Volume-Clocker, you need to modify the case by
removing most of one corner. See the photos for details. I drilled a
hole first, to make room for the potmeter axle, but I don't recommend to
do this. It's impossible since you're trying to drill less than half a
hole - you know what I mean? A Dremel and a Stanley knife will do the
job, and maybe a small hand file to polish the cuts a bit.
If the above pictures are not perfectly clear, I think it will make more sense when you have the case in your hand. Meanwhile I can recommend to watch the previously linked unpacking video (66 MB download) because at the end (last 30 seconds) you see the case and which corner needs to be modified. It should all make sense when you see it.
Software installation
The software I plan to use requires very little space. I think in principle you could do with a 64 or 128 MB card, but if you plan to try out something else, e.g. Raspbian (possibly NOOBS for beginners), you'll need an 8 GB micro-SD card. Feel free to make a different choice.
Software list:
- Win32 Disk Imager 1.0.0
- piCorePlayer 4.1.0 (with JiveLite GUI, installed through the piCorePlayer web interface)
Win32 Disk Imager is installed on your Windows 10 PC, so you can write the image file of piCorePlayer to the SD disk. My computer has an SD card reader built in, but if yours doesn't, then you'll need a card reader/writer.
With these choices, it's implied that I intend to continue with the Logitech Media Server, located on my NAS.
I followed the instructions on Archimago's BLOG on how to build a Touch Audio Streamer (from March 2017). In particular how to load the piCorePlayer interface, find the advanced settings in the Tweaks menu and then installing JiveLite is as easy as pushing the install button. I must say that the entire BLOG of Archimago is of high quality, with lots of fascinating articles, that I keep going back to and then I read them again!
As piCorePlayer initially booted, it "hangs" there with a clock sync, but that's just because you didn't push the ENTER button (which I suppose you can't on the Touch Screen), but I could read the IP address on the screen (given by DHCP from my router) and load the piCorePlayer interface in a web browser on my computer. I was also able to connect to piCorePlayer from LMS (Logitech Media Server) and play some music. It works, straight out of the box, put together and without any software configuration. The Logitech Media Server automatically found the piCorePlayer (and all other players, like the Squeezebox Duet, were unplugged). piCorePlayer is by default "headless" and the display isn't needed. The "head" part is taken care of by installing JiveLite.
JiveLite is installed from the piCorePlayer web GUI. It's as simple as going to Tweaks, and push the install button.
After installing JiveLite, select your language, then you may select your Skin - an option could be to pick Grid Skin (800 x 480) because this is the resolution of the 7 inch Touchscreen.
The touch display appeared quite bright to me, so from Touch screen of the device, using the JiveLite interface, head into Settings, then piCorePlayer, you can find screen brightness. Adjusting down to 50 works better for me. To preserve this setting for the future, choose "Save Settings to SD card". Now that the screen isn't so bright anymore, the CD cover / album graphics looks better.
When the album (playlist) is finished playing, I'd like for the device to go into sleep. This is managed on the server side by installing the PowerSave plugin in LMS. After installing, remember to go into LMS plugin Settings and set it up, and check-mark to Enable it on your piCorePlayer. In other words (a bit surprising to me), it is LMS that instructs your streamer when to go to sleep.
When the player goes to sleep, it initially doesn't do anything. To have e.g. the clock show up, you need to setup 'Settings' - 'Screen' - 'Screensaver' and choose what should happen when your player is stopped (I chose digital clock) and when it is off (I chose digital clock 'black' background). These two options are similar to the original Logitech Squeezebox Touch player, but feel free to choose another option.
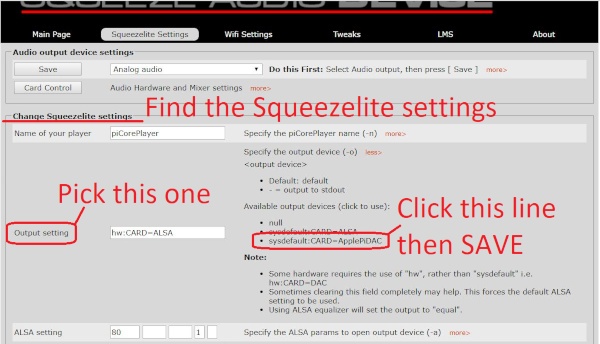
The ApplePi board comes with an EEPROM so that the Raspberry Pi can read the necessary configuration information from the board, and piCorePlayer supports this. This "overlay" is found in piCorePlayer settings:
    Go to [ Squeezelite Settings ]
    Click on "Output setting" - "more>"
    Look under "Available output devices (click to use):"
    Locate the line "sysdefault:CARD=ApplePiDAC" click on it
    Click [Save] further down below
I have informed the developers this works, and they have promised me, ApplePi DAC will be included in the list of officially supported devices in the future releases of piCorePlayer.
Be aware that you will have to reselect the DAC if you reinstall the piCorePlayer (or Squeezelite?) packages and reboot the machine. (TRUE??)
Summary: First step is to put the micro-SD card into the Raspberry Pi, hook up the Ethernet cable and power it up. Then identify the IP address from a PC and load the web interface from a browser on your PC. In Squeezelite Setting, choose the Audio output (e.g. the Raspberry Pi mini-jack audio output, or the ApplePi DAC). Give the Audio Streamer a suitable name to identify it in your LMS (Logitech Media Server). In the Tweaks menu, select the JiveLite package and install it. Reboot. Then load your LMS (on the NAS) in your web browser and identify your Squeezebox player (default name is piCorePlayer).
Software configuration
The combination of "everything" from Orchard, the biggest and fastest Raspberry Pi + the Touch display in total consume quite some power. I found that:
- The Raspberry Pi may need up to 7.5 Watt (max 1.51 Ampere, I think), but may typically pull 2.1 Watt
- The Touch Display may need some 3.2 Watt (max 0.64 Ampere, typically 0.40 A)
- The ApplePi equipment 5.25 Watt (The DAC 0.90 A, and the Vol-Clock 0.15 A), but may typically pull 3.4 + 0.15 Watt
In total max 15.95 Watt (3.2 Ampere). The ApplePi PSU is capable of delivering 5.25 Volt times 3 Ampere = 15,75 Watt (in practice when fully loaded maybe 5 V x 3 A = 15 W) and might be a little bit short of breath in the most extreme cases.
To solve this problem, it's possible to under-clock and under-voltage the Raspberry Pi, but it doesn't have a classical BIOS for setup, instead you edit the config.txt file. According to Archimago's BLOG, one can specify his Musings CRAAP settings (from November 2018) in the config.txt file. I've tested my system without doing this and after one month I haven't experienced any shortage of power with the ApplePi power supply, so I didn't underclock my system. Here are the CRAAP settings, as recommended by Archimago:
    # Archimago's CRAAP Pi 3 B+ Settings...
    arm_freq=1000
    sdram_freq=500
    core_freq=400
    gpu_freq=300
    over_voltage=-3
    over_voltage_sdram=-3
    # gpu_mem=16

    # Force max current to USB 0=OFF (600mA) 1=ON (1.2A)
    max_usb_current=0
I don't use the above settings, only the last one because I don't need to attach a USB harddrive. You can see (and modify) your settings from the piCorePlayer web GUI. Go to the Tweaks menu, find pCP Kernel Tweaks and push the "Advanced Overclock" button. A new page shows up with lots of warnings (text with red background). To exit this page, just go to the "Main Page" menu.
Besides disabling the high power USB, I have disabled Wi-Fi, Bluetooth and HDMI, since I don't need it. You can disable Wi-Fi in the piCorePlayer web-interface (and Bluetooth is disabled by default). Alternatively, adding below lines to config.txt will take care of that:
    dtoverlay=pi3-disable-wifi
    dtoverlay=pi3-disable-bt
In the piCorePlayer "Tweaks" menu, you can also disable HDMI power, to save a bit on power, which I have since I don't need it. Disabling this stuff means that the ApplePi power supply can power the system without any glitches, at least that's my experience.
Claus' updated settings for the 3 Model B (non-plus) 2022-10-15:
    arm_freq=1000
    gpu_freq=300
    core_freq=250
    sdram_freq=400
    #over_voltage=
    #force_turbo=
    max_usb_current=0
    avoid_warnings=1
Practical information about how to access the system from the command line and modify config files: If you know the IP address of the device, you can login with SSH. Windows 10 supports SSH on the command line. Just type:
ssh tc@ip-address
Here you must exchange "ip-address" for your actual numbers, for example 192.168.0.123. The default password for tc is piCore.
You're on a Linux machine, so commands are not exactly like in Microsoft Windows. You'll start in the /home/tc ("root") directory and to back down, for example to the /etc directory, which contains some Editable Text Configuration files, you type:
cd /etc
Now you can type:
vi
...to open up the VI text editor. For people unfamiliar with VI, it can be a bit of a challenge, so here's a crash course. First of all, VI is a visual overlay on top of the "ex" editor language, so VI has two modes - you start in normal (command) mode, then you can change to input mode where you actually write in the text file. In command mode you can move your cursor around, e.g. with the arrow keys. To insert text at the cursor position, type "i" or alternatively at the end of the line, type "A" (append) and start typing. When done, push the ESCape button and you're back in command mode, where you can write the content to file, type "w" and push the enter button. To quit the editor, type "q". That's the ultra-short and super-simple introduction to VI, which, if you care to learn, has enormous power under the hood.
For editing the config.txt file you'll need to mount the part that contains this file. Remember, piCoreplayer keeps this partition unmounted after reboot for a reason, to avoid corruption of data if power suddenly disappears (the device can be shut down brutally without problems). After editing the config.txt file, you should reboot the device (at least 'umount' the partition where config.txt is located).
    mount /mnt/mmcblk0p1
    cd /mnt/mmcblk0p1
    vi config.txt
In piCorePlayer Squeezelite settings there's a pair of controls for "Audio output device settings" and since this is set to Analog audio (i.e. the Raspberry Pi mini-jack output), the Card Control button here only controls what is happening in the analog output, not what is passed on the I2S to the DAC board, and we can ignore this setting, but for using the analog output I chose 0 dB (i.e. no additional gain, since this could create some clipping).
This brings me to the point that there seems to be overwhelmingly many ways to regulate the volume control, and not all of them are equally good. First the LMS server (on the NAS) can be used. It doesn't boost, only reduce, but uses floating point for the processing and should be disabled. This can be done in the LMS settings so that the output level is always 100%. When disabled, you do not have the option to control the volume from LMS. If you do this, there's no risk of accidentally decreasing the sound quality. Keep the software volume control, if you wish to use an app to control the volume with software (for convenience) - and in this case if volume = 100% the sound quality is not degraded and you're OK.
Another volume control is found in the Squeezelite client, which is part of piCorePlayer. You can also have some SoX commands take care of volume level (fixed, I believe), not easy to use on-the-fly. With the Volume-Clocker you may also use the digital bit-perfect regulation of the ApplePi system - it's probably better than your analog volume control, to a certain point. Last volume regulation is in your audio amplifier (if you have a preamp and/or integrated amplifier, which I do). In total some 4-5 different volume controls can be utilized.
I haven't observed any issues, but if you have trouble with some special characters in Jivelite, then you may wish to modify the font by installing the OpenSans family, so Squeezebox shows special characters correctly, see: slimdevices forum post by deschman. I didn't do this (yet).
Installing a firewall
This is an example which shows how to install add-on packages.
The piCorePlayer is one of these Internet-of-Things, I guess. At least it can fetch packages and update the system, and when expanded with features, additional packages can be downloaded on-the-fly. piCorePlayer is hackable and should be kept on a Local Area Network, not reachable from the internet. An additional security feature could be to install a Firewall on the machine, for example "iptables". You can install extensions, like iptables, directly from the piCorePlayer web GUI, by loading the GUI into your browser (type the IP address into your browser). On the first page (the MAIN page), under advanced mode operations, the last button ("Extensions") allows you to open another webpage. First, piCorePlayer will check that the device has internet access, so wait a bit until this is finished. Scroll down near the bottom and select "Set extension repository" and change from piCore to piCorePlayer repository in the drop-down box (and push the Set button). Then piCorePlayer will highlight a warning, to remember to reset this back to piCore, but ignore this for now. Further down you can now select "Available extensions" - pick e.g. iptables.tcz - and push the Load button. The package will be installed, including a couple of dependencies which are needed to make iptables work. When finished, then you can go back and reset to the piCore repository. That's it, you've now learned how to add packages to your piCorePlayer. There are many to choose from. To actually configure the new packages, you'll have to use the command line and edit the configuration files (as exlained above, with the VI editor).
Configuration of iptables: First you must SSH into your machine. SSH is supported on the Microsoft Windows commandline, like mentioned before. Just type:
ssh tc@ip-address    -  replace ip-address with the address of your piCorePlayer device
                     -  you're then prompted for the password for user 'tc' on your piCorePlayer
cd /                 -  you start in /home/tc  -  this command brings you to the root of the file system
sudo iptables -L -v  -  should give you an error, no rules created yet. Create rules first:
sudo iptables -A INPUT -i lo -j ACCEPT          (allow any connection from this device)
sudo iptables -A INPUT -s 192.168.0.0/24 -j ACCEPT          (allow any connection from the local network)
sudo iptables -A INPUT -m pkttype --pkt-type broadcast -j ACCEPT          (allow all broadcast traffic)
sudo iptables -L -v  -  now you should get a nice list of rules that have been applied.
In the above list of commands I write the IP address: 192.168.0..., which must be replaced with a valid IP address space for your own network.
Be aware the above iptables commands allows all traffic from any internal IP address so you won't accidentally block yourself from further accessing the piCorePlayer. It's almost pointless, but at least I don't break your system. We didn't create any Forward or Output filters. Hereafter it's your job to detail what exactly you wish the firewall to drop and/or reject. Here's a guide: The Beginner's Guide to iptables, the Linux Firewall. Finally, don't forget to save your work to the SD-disk. If you don't, then your iptables configuration is lost when you power down the device.
If you leave the configuration wide open (as with above initial setup), then you can come back later and with the iptables -L -v command you can see how much traffic is going in and out. Input and outputs will probably show some activity, but the system may not have forwarded a single package, because it's not in the middle of your network (it's an endpoint device). Blocking all forwarding (broadcasting) could be helpful in preventing the device from being used by a hacker, but if you wish piCorePlayer to also be a Wireless Access Point, it's one of the added (beta) features available in the Wifi Settings, then you should keep this wide open.
Note 2022-10-16: It seems that iptables will be replaced by nftables. What's the difference?
Evaluation (audio)
Initial impression: After listening three days (mostly evenings) in a row to a bunch of different music, my primary impression is that this system resolves many details. Overall, my audio system is much clearer and more well defined than before. I am impressed. Great stereo imaging, but I think it's due to all the details (and technically speaking the signal/noise ratio). Sometimes I react and look up from what I'm doing, thinking "wow, what just happened?" The sound is not ear tiring, I can listen for hours, but it is not a "laid back" and relaxing or romantic sound character, but rather dynamic.
Amir does a great job at AudioScienceReview to measure devices. First review August 2018 of the ApplePi (without Volume-Clocker), compares the ApplePi DAC to Allo Katana. Second review October 2018 of the ApplePi with the Volume-Clocker, using balanced (XLR) output, Amir concludes "The performance of Orchard Audio AppliePi is within hair's breadth of state-of-the-art DAC." Third post is Leo's own measurements (31. October 2018). The ApplePi runs fine without the Volume-Clocker, and contains a Master Clock (MCLK), but with the Volume-Clocker installed, besides the additional MCLK, further 3 clocks are added (DATA, WCLK and BCLK) and you get lower jitter. Can you find a DAC that measures better? Probably yes. For the price, the ApplePi is a good option.
I must say that the people at AudioScienceReview impress me. Take a look at this thread where they together try to solve why so many implementations of ESS DACs all show some strange THD: ESS THD 'Hump' Investigation.
Upon further listening (almost every day for a month), I verify my initial impression and add that the system has the capability to render good depth perception, a lot of space is communicated. I am satisfied with the purchase and am enjoying to listen through my music collection once more. I often smile about how I spent in the ballpark of 500 EUR on the system and it competes with commercial products that cost many (at least 5-10) times more.
Please note this audio evaluation is conducted with the RCA output.
If you don't feel like doing your own build of a streamer and DAC then a commercial competitor could e.g. be the Bryston BDP-Pi, which cost 1300 USD. There's no analog output, since it uses the HiFiBerry Digi+ audio card, so you'll have to complement the system with e.g. a USB-DAC of your own choice.
- Upsampling -
With extensive listening I think maybe the highest frequencies are not 100% fantastic when playing 16 bit, 44.1 kHz programme material, which unfortunately is the vast majority of my music collection (ripped from CD's). The reason could be the fairly steep filter in the DAC.
The Raspberry Pi and piCorePlayer offers the feature to upsample, with specification of the filter, which essentially bypasses the 8 x oversampling filter in the 1794A DAC. A Pi has much more processing power than a DAC chip and can do a much better job. This only makes good sense at 44.1 kHz and 48 kHz material, whereas with high-res music the potential artefacts of the upsample filter is inaudible and I would just let the 1794A DAC do its job.
With the Raspberry Pi you can play around with upsampling and various digital filters because Squeezelite (in piCorePlayer) includes the SoX library. Archimago has several articles on this topic (in chronological order):
1. The first one goes through a handful of very different settings, which neatly show how you can apply different filters and shows the breath of what you can do in piCorePlayer.
2. Goldilocks seems to attempt at a compromise where badly engineered music doesn't sound awful. Notice that the Goldilocks settings allow for some aliasing, which classically is considered a bad thing.
3. Shortly after the Goldilocks BLOG post, Archimago published a mythbuster BLOG post about the ringing from digital filters.
4. Finally, Archimago presents another upsample setting named Extremus, which specifies a brick wall filter (v::3.05:28:99.7:100:45), but I prefer a less aggressive filter, where the high frequencies appear more fluid (and pleasant). It's not just the level difference, I corrected for this in my evaluation (of course), but it might have to do with the difference in headroom.
It's cool that in piCorePlayer, Squeezelite Settings, you can specify different strings for upsampling, and push the SAVE button which shuts down Squeezelite and then Squeezelite is restarted, the music stops for 2 seconds, and now the last song restarts over again, so you can hear the change.
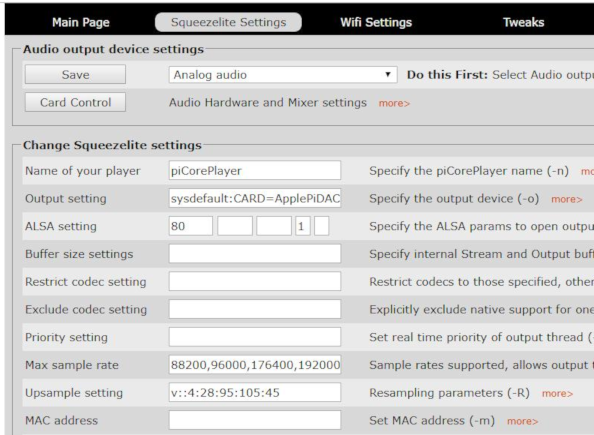
After testing above work from Archimago and listening through a bunch of different music multiple times, I have (at the moment) settled on a compromise. Both the Goldilocks as well as the Extremus shows that Archimago favors a phase setting of 45, and I tend to agree. My current preference is: v::3.5:28:95:100:45 which compromises on gain level between Goldilocks and Extremus, plus I reject aliasing totally, but do not specify as steep a filter as Extremus - again, it's an in-between solution between Goldilocks and Extremus.
Under "Max sample rate," all acceptable sample rates for the output device are listed. There is no mention of 44100 or 48000, so these are upsampled to double their rates (i.e. 88200 and 96000). This means that in my setup, the ApplePi DAC doesn't receive anything lower than 88.2 kHz. SoX is used for upsampling and Ubuntu has a great manpage for Squeezelite, which explains these SoX settings nicely.
For example, under "Upsample setting," the (Goldilocks) string v::4:28:95:105:45 means:
- v means very high quality algorithm (the most CPU intensive)
- :: (the empty space) means no flags were applied
- 4 means we're lowering the overall level with 4 dB, giving a bit of headroom e.g. for intersample overs
- 28 means we're upconverting to 28 bit, giving extra precision, which reduces rounding errors
- 95 means the upsample filter starts at 95% the sample rate
- 105 means the upsample filter cut frequency is at 105% the sample rate (this allow for aliasing to occur)
- 45 means the filter is almost linear phase
This is a reasonably steep filter witout being aggressive. For example if the incoming signal is 44.1 kHz, the Nyquist frequency is at 22.05 kHz, and the filter starts at 95% = 20.1 kHz. Likewise the filter is at its full effect at 23.2 kHz. With these settings the response is flat to 20 kHz. The last number is a phase setting, between 0 and 100, where 50 is linear phase, so we're fairly close to that, and 0 is minimum phase.
Just to ensure no misunderstandings, above example is the Goldilocks settings, whereas I've ended up with a steeper filter (v::3.5:28:95:100:45).
Whenever I have removed the upsampling settings in piCorePlayer, to listen to the system "as is" then I have identified the difference and quickly reloaded the upsampling settings. This happened (repeatedly) on a wide range of different music.
Note 2022-06-17: After a while I enabled Bluetooth etc and over time the Raspberry Pi developed an 'Undervoltage' illness. I think the Raspberry Pi 3 Model B+ with these features enabled and combined with the ApplePi DAC was a bit much. Unfortunately, as I proceeded to use the device, I experienced instability issues (involuntary reboot). Orchard Audio recommends not to use the B+ edition, but the regular Raspberry Pi 3 Model B, as it is less power hungry. Although I have then removed the HATs (Volume-Clocker and DAC), and tried different power supplies, the Undervoltage error persist and I conclude that the Raspberry Pi 3 Model B+ isn't fit for fight anymore.
I replaced with a 3 Model B (non-plus) and at first (without the DAC) it works fine, but as the DAC is added, the Undervoltage warning shows up again. Just a note: I have moved to another location and need Wi-Fi enabled because I do not have ethernet near my stereo. I conclude that one might also need to change the screen (i.e. 'everything') to avoid this, but the new Model B should not have suffered damage, so I disabled the lightning bolt with a setting in config.txt: avoid_warnings=1. The disadvantage of this downgrade is the fact that the non-plus model use an older Wi-Fi chip that only supports single-channel 802.11n, whereas the plus model supports dual-channel 802.11ac.
On the internet you can read that the Undervoltage lightning bolt is a sign of problems and should (at least in principle) not be disabled. I will report back, if I run into problems. I cross my fingerst that I will not experience instability. Rumours on the internet is that the power supply (or the connector) can turn bad, in which case one needs a new one. The one sold with the ApplePi DAC is found here: Mackertop