Preface
This information is about managing your music library accessible on your local network, NAS setup and network players - and in particular my personal experience with the Logitech Squeezebox Duet.
This information is targeting Microsoft Windows users. It has been prepared on a Windows XP computer and hence I cannot guarantee that it'll work on other versions of Windows, but I assume so - and I'd be interested to hear about your trouble, if you run into any.
For Linux users (which I do use myself), you'll probably know how to handle the command prompt, and it should be possible to read this and get going anyway.
This document is about 20 pages of printed text with pictures, including subsections and contain a large variety of different subjects. I recommend that you check the table of contents and zoom to the sections of particular interest to you.
Table of Content
- Intro
- Audio Evaluation
- Squeezebox Remote
- Squeezebox Hardware
- Hardware Setup for a Music/CD Library
- Making a CD Library (software)
- Managing the Music/CD Library
- Album Cover Art
- Squeezebox Setup
- Hardware Upgrade
- Building the power supply
- Audio Evaluation with the Power Supply
- A Few Notes on the Squeezebox Duet
Intro
First of all, I organized my music on my network hard drive a while ago and put all my CD's on it. It became an incredible convenience to play the music this way, and I initially ended up tying my laptop to the stereo because I used the headphone output to my amplifier. The laptop analog output (a Realtek AC97 chip) actually sounded surprisingly OK.
I know there is a debate on which format to use. I chose without hesitation to use FLAC (Free Lossless Audio Codec). There is no further debate about this aspect. Feel free to make your own choices.
After a while I decided to buy a real network player. If I had the budget to buy an upscale player, I'd probably go for a Linn Majik DS or equivalent (second on the list could be the Logitech Transporter), but without any experience in the field, I decided to buy something cheaper. I chose the Logitech Squeezebox Duet, which has the best remote control available. To be honest, sound is not the big thing with the Duet Receiver, but after all it only is an 895 DKK device. What you pay for is the remote; its price tag is 1395 DKK (at the time of purchase). The total including a discount was 2262.50 DKK but I know it has gone down in price already.
The basic idea is that you can improve the sound (by upgrading the hardware, using an external DAC, etc.) but it is quite difficult as an end user to improve on the user interface of such equipment, hence my preference for the Squeezebox Duet combo.
Audio Evaluation
As I put the Squeezebox Duet to work, I was surprised how bad it sounds. Basically the onboard laptop soundcard does a better job. My first impression is that the Duet does not engage the listener as I was used to with the laptop. Later I concluded that the sound is "grey" and only suitable for background music. The bass can behave out of control and rumbling. Details are lumped together and during some passages in the music, the sound becomes tinny and metallic.
You can say that I was disappointed to have paid money for this device, which I had hoped would sound better than my computer laptop. A bit later reality appeared, that the actual sound device (the Receiver) is only 895 DKK and how much can you expect to get for that money? Besides the hardware you also pay for the software (the user interface).
Squeezebox Remote
The remote is a tad on the expensive side, for what it is, I think. On the other hand, I've seen remotes considerably more expensive than this. The remote is actually a small computer, including an analogue output for headphones. To make the remote "handy" it contains a small lithium-ion battery pack, like what you'd find in a digital camera. The remote is a computer, and the battery only lasts a few hours. Keep it in the charging cradle as much as you can.
The remote is very nice looking and works swiftly. There's only a few buttons and it takes a bit to become familiar with it. The menu only contains available points - like during setup, you cannot go into other submenus. The remote has an energy saving facility - if you turn it face down, then it will go into hibernation. Nice feature, but only necessary because it would otherwise drain the battery. Be aware that the display is not coated to be scratch resistant, nor does it reject dirt. The coating is a polarizing coating for vibrant colors. For the price I think Logitech should improve on the surface coating of the display.
The remote is the first from Slimdevices / Logitech, which uses Wi-Fi. Others are available - like the Philips Pronto series (which do infrared and Wi-Fi). Philips TSU9200 is the least expensive. Anyway, the Controller does a good job. Another comparable device is the Apple iPod Touch. Compared to these two alternatives, the Logitech remote seems a bit pricey. On the other hand, the remote is what completes this package - you can make the system work right out of the box.
Squeezebox Hardware
I started investigating why this device was so bad, and I was delighted to find that most of the device is actually made with what I'd call "second grade" components - i.e. not first grade, but something good enough that it should be possible to make it better with some improvements. I found several, who were offering upgrades. The most significant factor is that the Duet Receiver takes the power supply voltage directly (more or less unregulated) into use in the management part, as well as the digital and the analog parts. This is scary to realize because the power supply is nothing but a wimpy external switch mode thingy similar to what charges your mobile phone.
People on the SlimDevices forum informed me that the Duet Receiver utilizes one voltage regulator at the input of the 9 Volt supply. The rest is handled by internal switchers, which is maybe not the best solution.
The DAC itself is "medium quality" (or "second-grade" quality). It requires 5 Volt, so the Receiver must convert the 9 Volt down to 5 Volt. This is what the manufacturer (Wolfson) writes about it - compared to what you'd find in a Hi-Fi DAC (as used in Linn Majik DS and Akurate DS):
Squeezebox Duet: Wolfson WM8501 Stereo DAC with 1.7Vrms line driver 2 channel, 100 dB SNR / -88 THD, socket SOIC-14.
Linn Akurate DS: Wolfson WM8741 High Performance Stereo DAC 2 channel, 128 dB SNR / -100 THD, socket SSOP-28
(Majik DS uses a single DAC, whereas the Akurate uses a two-DAC setup)
As you can see, Wolfson does not classify the DAC used in the Duet Receiver as "High Performance" and it is of the type, which includes analog circuits on the DAC chip, for easy design, but not for super-high audiophile grade sound quality. It should still be OK.
Here is what's used in the more upscale Logitech Transporter: Asahi-Kasei AK4396 DAC
Searching the internet I did not find a simple "replacement" DAC for the Wolfson WM8501.
Although the Wolfson DAC WM8501 supports sampling up to 192 kHz, I found that the music samples I downloaded from HDtracks in 24 bit and 96 kHz sample rate were not supported by the Squeezebox Duet setup, whereas playing the same files through WinAmp on my computer was no problem. I take it that, although supported by the DAC, there's something in the Logitech setup that isn't OK with this high-definition (Blu-Ray Audio) FLAC file format. Later research on the forums at SlimDevices has informed me that the Duet does not support this format and apparently will not be able to. If I had known, I probably would have purchased something else. What a pity.
My personal favorite DAC manufacturer through more than a decade is Burr-Brown (now High-Performance analog section of Texas Instruments), and they have a reputation for best DAC's and the products using Burr-Brown tends to receive good reviews. The reason that Wolfson has suddenly received a cult status as a "wonder DAC" is probably due to the review at "DAC Final Test." The Wolfson DAC tested is WM8740 mono, almost the one used in Linn Akurate DS. I give this man credit for his thorough work and displaying it on the internet. Within his setup I do not dare to doubt his subjective evaluation (albeit subjective, we must realize that this is really what counts). I appreciate the good work of this man, as we could use more information of this type on the internet - and fairly recent material (2006). Furthermore Wolfson is receiving increasing interest from hardware manufacturers around the world, small and big companies. Wolfson is primarily known for low-end gear, including e.g. the Apple iPod. Anyway, the WM8740 should be distinguished from the basic WM8501 used in the Duet Receiver.
No doubt the DAC world is very competitive, and we see for example Cirrus Logic DACs used in e.g. quality mid-fi Marantz equipment as well as very expensive upscale Accuphase gear, maybe because it is the best available to handle DSD (SACD). At "DAC Final Test" these DACs are claimed to be too smooth. Maybe an analog sounding DAC? Maybe it is too smooth in the setup (where output transformers are used).
At another site, a guy is trying to wrap up a super-DAC. The Wolfson DACs are not even listed, because according to the author the specifications are just not good enough. You can safely conclude that the picture isn't clear anymore - there's no clear leader in the field of hi-fi DACs. I am sorry that I've lost the URL to this.
I have heard about people making major upgrades to the Duet Receiver, some even ditching the entire DAC and analog section and replacing it with their own. One example used an evaluation board from Analog Devices, which according to rumors is what goes into the Benchmark DAC1 (AD1896). This evaluation board is no longer available from AD.
If you really want the maximum out of the Duet Receiver, then you should probably connect the digital output to an external DAC. According to a friendly source, the volume control will still work, which means it is regulated in the digital domain (reducing the number of active bits). The SqueezeCenter software provides the option to disable the volume control, if desired.
I will make modifications - initially to the power supply, which seems to be a given for a very large improvement according to several sources on the internet. I will return with further information about the Duet Receiver modification, when I have some results.
Hardware Setup for a Music/CD Library
My journey with CD library on a network hard drive (a NAS - Network Attached Storage) started with the old computer (now more than 10 years old, and still running) needing a backup, and also my work laptop needing a backup, e.g. of my private digital photos. I looked into various options, but chose the real solution - a NAS. Choosing a NAS can be like choosing a religion. I chose to pay a few pennies extra and get a semi-professional NAS, which has two hard drives in a RAID 1 setup as an extra safety feature - it is after all my precious photos we are talking about.
I looked at D-Link DNS-323, QNAP, etc. but finally chose the Synology DiskStation 207+, which has a nice graphical (browser-based) interface and lots of features. I've equipped it with 2 x 1 TB disks (one from Seagate and one from Samsung - not recommended, but running OK in my setup - consider choosing Western Digital instead). I can highly recommend the Synology DiskStation series. Some may prefer QNAP, and on basic features they seem a better option, but for me the neat and powerful Synology drive is the best choice when it comes to low-noise, low power consumption and high speed. When you choose your NAS, make sure you get one which matches your priorities. Mine are:
- Ease of use
- Low power consumption
- Low noise
- Fast
All of them are in my opinion important and I don't like to compromise on them.
When I decided to buy a real network player, I had no extra ports available in my router (I already used all 4 ports, one for my Desktop computer, one for the laptop - just to give it a rock solid connection, one for my printer and the last port for the NAS + the 5th WLAN port for internet connection and firewall). It is a 100 Mb 4-port Linksys WRV200 - it is a bit nicer than the usual WRT54GL, with 32 Mb RAM and VPN features. Basically, any router will do.
I chose to buy a switch, which can handle the 1000 Mb speed and make networking smarter. I chose the Linksys SLM2008, which is smarter than a basic switch. There's a nice GUI interface for management and settings (which I haven't used yet) and the 8 ports should be enough for me, for a while. With the router and switch combined I still have 3 ports available.
The router is still used as it handles wireless access (fully encrypted and filtered), WAN (the Internet Access) and is connected to the switch here by taking advantage of the built-in DHCP server. That's it.
A switch is smarter than a hub, but it is a bit simpler than a router in the sense that setup is not necessary.
Basically a hub receives an Ethernet package and sends it to all ports - the receiver in the Ethernet device picks up his package and the rest of the receivers choose to ignore it. This of course uses your network bandwidth in a wasteful way. This way a hub handles Ethernet communication in a very simple way, which among the advantages requires no setup. As far as I know, people don't use hubs anymore (except for e.g. USB hubs).
A switch on the other hand reads the received packages and passes the package to the intended receiver only, vastly reducing the amount of communication and this way each device on your network is able to send and receive much more communication - at full speed. In fact the switch can handle 4 senders and 4 receivers, each with 1 Gbps of communication. Switches handle duplex (sending and receiving at the same time to the same ports) but in the case of the Linksys SLM2008, not all ports can send at full speed simultaneously (in total the switch handles 4 Gbps of communication, according to its specifications). The switch required no setup - it was simply a matter of plugging the cables in and turning it on.
Making a CD Library (software)
Several weeks before the Squeezebox Duet came in the mail, I chose to install the SqueezeCenter software on the DiskStation. This unfortunately is extremely simple, because SqueezeCenter is a supported package by Synology. I was able to download a ready-made package from the Synology web pages, and load it with the DiskStation Manager software (DSM 2.1). The software package loaded nicely and installed itself automatically. Afterwards it was necessary to setup the package settings and run a disk scan (which can take several hours).
I was unable to register the SqueezeCenter with Logitech until I had the Duet package installed. Fair enough. With the registration you get access to some additional (online) features, probably some of them with license, like last.fm, etc. One of the nice features of the Duet is the fact that you can plug it in and play - whether you have a CD library or not. I had it ready before I got the Duet, but other people may go the other way around, in which case you start by having a nice and fancy internet radio device.
When the scan was finished, I noticed that several files could not be found. What I had to learn was the fact that my files, ripped from my CD's into the lossless FLAC format, contain some tags that are read by the SqueezeCenter. At first I thought this was the Windows Documentinfo, but this is not true. The FLAC tags are inside the files and to be read with dedicated software.
To make a CD library on a computer (or external hard drive of some sort) you need to rip your CD's with software. My choice of preference is the software named Exact Audio Copy (EAC).
I change the mp3 ripper in EAC to FLAC to maintain the full CD quality (a lossless codec). I use AccurateRip to ensure that the rip is of high quality. EAC takes care of most of the tags, and I made the setup so that the file names include the track number (this way I can always identify which track the song had on the original CD).
There are several pages on the internet describing how to do this. Among things you must (at least try to) setup, is making the disk drive read without automatic error correction to take advantage of the features of EAC. Here's what I have on my computer:
Open EAC -> EAC menu -> EAC Options -> Filename; Naming scheme: %N %T, which assures that each filename is started with the track number. In the EAC example box you can see how it can also be done, e.g. to make EAC write the artist into the filename as well.
Open EAC -> EAC menu -> Drive options -> Extraction Method; Secure modes:
X Drive is capable of retrieving C2 error information
Be aware, your situation may be different. During installation and setup of EAC you must "listen" (=read carefully) what happens.
Open EAC -> EAC menu -> Compression Options -> External Compression:
  X  Use external program for compression
  X  User Defined Encoder
  X  Use file extension .flac
  X  C:\Programmer\Exact Audio Copy\Flac\flac.exe
  X  -8 -T "artist=%a" -T "title=%t" -T "album=%g"
        -T "date=%y" -T "tracknumber=%n" -T "genre=%m" %s
  X  1024 kBit/s (this don't matter, AFAIK)
  X  Delete WAV after compression
  X  High Quality
  X  Check for external programs return code
  (Do not use CRC checks)
  (Do not Add ID3 tag)
EAC has been available for a while. Other options are available and I'll let it up to you to evaluate your preferences and make the decision yourself. I still like EAC.
I place each CD in a separate directory following the logic that
- First directory level is the Artist
- Second level is the album title
For me this directory structure means that I can find the music I want to listen to through 1) Choice of artist and 2) Choice of album.
I realize that other people might want to do this in a different way, especially since you will be met with some challenges if you follow this logic (e.g. what to do with albums containing several artists - for example "Riding with the King" is featuring Eric Clapton and B.B. King). I have seen several examples. Some don't organize the files at all, they just name each file with all possible information (artist, album, track no. etc.) and put all files into one big "bath" ... I can only imagine this being good if you have a piece of software or hardware that doesn't work with subdirectories. Luckily the SqueezeCenter has no problem with that - it even uses the directory names for extracting information (artist and album title) and it seems to be doing a good job.
Another option is to make 1) Album title and 2) Artist. The advantage is that a compilation album with many artists can easily be organized. In case of an album where two artists are playing together, this is somehow easier too. I just find it hard to search my hard drive this way. I also like to limit the number of directories in the root of the hard drive. You most likely have more albums than artists (simply because of your natural preference for certain music). Choosing 1) Album and 2) Artist make each new album have a new directory accessible from the root, and also reduces the depth of the directory structure, which could be a good thing.
If you like to have your files structured the way I do with 1) Artist and 2) Album, you'll probably need a special directory named "Various Artists" (or something similar). Here you can put all your compilation albums. Then you need an alternative way to list artists (see next chapter). You might also want to make a special directory named "Soundtracks" for music from movies, for example, I own "Pulp Fiction" where you'll typically find a broad range of various artists as well.
Think about this for a while. Your choice now will affect how you access your music from the hard drive. Changing it can be a very large amount of work - although using a batch file to do the job can make it approachable. When accessing the music from software, like the SqueezeCenter, the exact structure is not that important.
Managing the Music/CD Library
As mentioned earlier, when the scan was finished, I noticed that several files could not be found with the SqueezeCenter software.
To fix errors in the file tags, I downloaded a FLAC tag editor. Several are available - some can auto-tag your files, others have a nice GUI, but it is still tedious to manage several thousand files this way. I personally found that many files had to be fixed, so I downloaded a command-line tool named TAG - at first this seemed basic, but it also seems to be the most powerful tool available. Furthermore, I downloaded a GUI front-end to tag.exe.
It can be incredibly tedious to be "online" with your NAS and change each file and each directory by individual and direct handling. It is slow too. Instead, I thought out a way to do this as a batch job (Windows supports .bat files). Read about my way of doing this in the subsection on command-line management of your music collection.
The job of editing all the files (names and tags) can be very tedious. In my case it took about 15 hours total. Be warned - and pleased that you can break it into several smaller jobs. When you execute a batch file to do all the renaming, be aware that it might take a while, as in hours. All the tagging can take a very long time - I broke it into several smaller batch jobs, but total we're talking about 8 hours of tagging ... good that I didn't have to do it "online" but had a batch file that could take care of it.
Besides - when you plan for these batch jobs, you can leave the files as they are until you're ready for the makeover - and don't need to re-scan the SqueezeCenter database all the time, only a few times is necessary (depending on the number of batch jobs). Wiping the database and doing a complete re-scan can easily take an hour (see screen dump below). Scanning for updated files only is a 20 minute job. At any rate, doing these things is something I'd prefer to keep to a minimum.
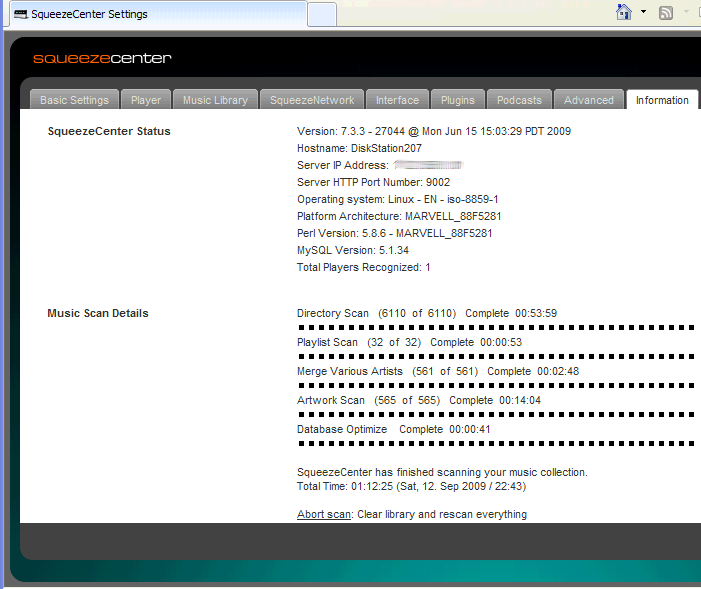
To the benefit of the Squeezebox, scanning for updates doesn't prevent you from playing music at the same time, which I find to be a great convenience. Organizing (renaming files - and changing tags) requires a complete re-scan.
I obviously had a lot of editing to do, maybe because I made the music library first, then discovered how to user SqueezeCenter later. If you just have to fix a few things, a GUI software most likely will be more convenient for you. For this I found MP3TAG quite convenient (in this case v. 2.44). A tip for Linux users, check out EasyTAG.
You can read the MP3TAG Guide on the SlimDevices Wiki pages to scratch the surface of what can be accomplished with MP3TAG.
Album Cover Art
The Squeezebox system supports album cover art. Most people (like me) could not be bothered with scanning all the original CD covers. Hence the challenge is to find suitable pictures online.
Next step is the search for album cover art images (so that you don't have to scan your own CD covers). I've found Amazon and Wikipedia to be great sources of freely available images.
Before doing manual downloads, try to find a piece of software that will do it for you.
Just search the internet for "cover art software downloader". My first attempt was with e-mix Cover Downloader. The download file, SetupEmixCD_1_0_3.exe, is just 5 Mb. It runs for 15 about minutes. It recognizes FLAC. It automatically downloads cover art for your albums, found at Amazon.com (or .de or ...). Downloading took another 15 minutes. When completed, each cover art file is neatly placed in the correct directory, ready to be used by SqueezeCenter. The quality of the image is 500 x 500 pixel - plenty good for my Squeezebox controller, it apparently shows up twice, once as folder.jpeg and once with the name of the artist + album (??). Only very few album covers were not found. Some of the covers are not like what's on my CD covers (e.g. Pink Floyd, The Wall, CD1 and CD2). The e-mix Cover Downloader only gets about 50% right and the rest are bad guesses. It took quite some deleting to straighten things up. Anyway, I am in favor of something that goes without user intervention at first, just to get a lot of things done, quickly, it gives you a flying start.
My second attempt was with Album Cover Art Downloader. This is also for Linux (Open Source). The Windows XP version uses a good installer. It took only about 5 minutes for the software to run through my music. I guess it only downloaded what wasn't already there. It found some new ones, and requires that you do some manual selecting (nice for preventing screw-ups, but also not so fast). Sometimes the album cover is just grey, but as you highlight it an image shows up - if you select the image you can then click the "Set as Cover" button. The software can be slow at doing this - especially because it assigns the cover to each file in the folder (approx 1 second per MP3 file - with FLAC it is faster and simpler). If you close the software and open it later, it remembers what it found. You cannot use the arrow-down button to go down the list.
Searching is default to Amazon - remember to add the other options for more cover art, otherwise "Download Covers" gives very few new hits. When enabled I happen to get some Python errors. If the folder with the files has additional information, like the year of the album, then remove this information in the Album line (top right) because this software searches quite accurately on the supplied string (but not case sensitive). Reducing your string will bring up more hits and maybe what you're searching for. I think this software requires that the directory structure is 1) Artist then 2) Album since, if I have a CD with a 3rd subdirectory (Disc 1, 2) then it reads the information wrong. It also clarifies that this software does not read the information from the tags in the FLAC files. This could be related to the fact that the software only reads MP3 file tags.
It does not handle Danish characters well - delete text with Danish characters. It is probably the same for other languages - if I want to find Svarta Bjørn by Kari Bremnes ... delete the word Bjørn, search (for some odd reason it worked for Sissel Kyrkjebø, Soria Moria). Similar with On Holiday with Søs Fenger ... delete Søs and let the artist be "Fenger" only. It works. Sometimes removing the word "the" can also help, as in "The Moody Blues" and "The Collection" ... just search "Moody Blues" and "Collection" - it works, but don't remove "the" in the middle of a search line, since the software searches for an accurate match, a missing "the" in the middle prevents you from finding a match.
For fixing a single album, Album Cover Art Downloader has a convenient search string.
If you accidentally started a Download Cover process with wrong artist or album, let it complete. Program error means that if you don't, then there'll be some leftover string at the bottom, which does not go away and repeating this will make the window wider and wider and in this case you'll have to shut down the software and restart it. Nothing is lost, though, so you're safe. This procedure of semi-manual editing obviously took some hours. The software works OK, but there's room for improvements.
I also tried the following software:
AlbumArtDownloaderXUI. This software also has a nice Windows XP installer, very simple. At the first start it takes a minute before the software has finished its initialization. It doesn't search your hard drive, if I understand this program correctly; you can "just" search a vast amount of album directories on the internet (with album or artist keywords). I found it to be inconvenient.
Cover Art Downloader version 1.1, downloaded from cnet. Nice and quick installation. Only does MP3 files. Finds its covers on Amazon. I deleted this software.
MuvUnder Cover: The Album Art Sleuth 1.6.0.0. MuvUnder Cover costs 14.99 USD, but you can try for free. Nice and quick installer. Only does 25 album cover downloads before requiring you to buy the product. With limited album covers I decided to save this when done with all other options - just to see if you get anything exceptional for your money (or just a nice interface). MuvUnder Cover was loaded as I was finished with Album Cover Art Downloader. It took a few seconds to initialize. Then asked some first time question ... I chose to load the free software. It selected my network drive fine and found a ton of directories. I chose to focus on 7 directories, which were scanned. 250 files were loaded with album cover art (none yet - it had to be downloaded). Then it was sorted into 20 albums. MuvUnder Cover found 10 out of 20, then asked if Google image should be used for the rest. I chose yes. MuvUnder Cover showed up to be better with the Danish work, and also some Lynyrd Skynyrd (The Ultimate Collection) but also had a couple of mis-hits, like an Aretha Franklin CD which gave me a cover of George Michael (??).
In case of multiple hits, the album shows a number of dots above the picture. Hover your mouse over the picture and choose left-arrow or right-arrow to move through the list. You then check off the albums you want to save and push the save button - only with the trick that all album covers are already checked - so you have to uncheck the ones you don't want (which was about half in my case). The software then attempts to load iTunes (if installed) - I do not. The album art is hereafter saved in a number of files (133 in my case) - this takes several seconds per file and totals to more than an hour of work for the computer to complete the task. In my opinion MuvUnder Cover appears to be a great piece of software - less user intervention than with Album Cover Art Downloader, and more success in finding cover arts + a quicker assessment of the results. When done, the albums with cover arts downloaded and installed are removed from the list, leaving the yet to be approved albums to work with. Apparently I lost my wireless network connection as the album covers were being installed - MuvUnder Cover kept going, but showed me later that things were not OK - so I got at change to push "Save Album Art" again and complete the task. It seems to me that MuvUnder Cover handles this kind of exceptions very well.
I also tried to download MediaMonkey, which is not specifically for this purpose, but general purpose software and promised some level of album cover art handling. It took a bit longer to download. The installer is nice. When loaded, the software did not let me select a network drive. I wrote Z:\ and it started scanning that directory. It takes about 25 minutes. I found a way to apply pictures as album art, but no way to download from the internet. The software is big and maybe I just didn't find the right menu entry. I deleted this software.
The conclusion is that e-mix Cover Downloader is your best bet for a quick setup without too much user intervention. Hereafter Album Cover Art Downloader is my preferred option for a GUI to trawl through everything. If you're willing to pay, then MuvUnder Cover has a leading edge.
Squeezebox Setup
The Squeezebox Duet lives on the network, that is Ethernet and Internet. The setup can be a bit tricky and it helps to be a network expert. I may not entirely classify as an expert, but do know the basics. For my spouse, it was more of a pain and while the ins and outs were not completely sorted out, she would call me at work complaining about it not working, and not understanding why. Turning everything off and then on again is in this case not always successful.
One of the complications with the Duet system was the fact that my network uses DHCP (which is how 98% if not more is setup at peoples homes), which means that each device gets its IP address from the DHCP server as it connects. The Squeezebox supports this, but the next time it tries to connect with the fixed IP it got the last time, sometimes resulting in IP packages clashing with other devices, which have later been given that particular IP address. The result is random garbage.
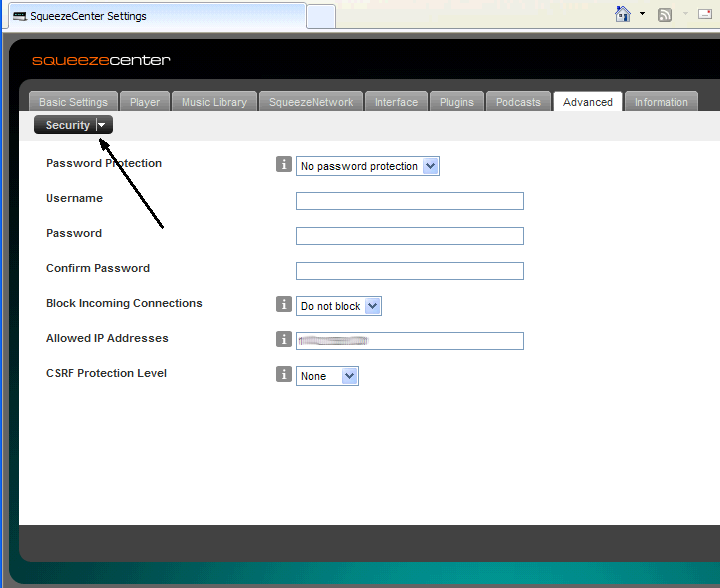
The solution is to go into the SqueezeCenter software, locate your Duet Receiver and provide it with an IP address that you know will not be taken by other devices. How do you do that? Well, the DHCP server has a lower number by which it starts. In my case 1xx.168.1.100 and each device adds to this, as in 101, 102 and so on. By giving the Squeezebox Receiver e.g. number 200 (1xx.168.1.200), the address will always be available.
When the Duet Receiver logs onto the network the next time, it will just assume that 1xx.168.1.200 is available and start using it. The DHCP server will let it pass (i.e. do nothing). See screen dump below - the IP address reserved should be entered into the "Allowed IP Addresses" input line.
The Duet Receiver is named the "Player" in the SqueezeCenter software, probably because other devices (like the Logitech Transporter) exist, and they are classified as players as well.
In my opinion, network setup should not be this complicated, and Squeezebox devices should find a way to prevent IP clashing (including the SqueezeCenter software), for example it could support Zeroconf (a literally zero configuration protocol for the Ethernet), previously Apple Bonjour (the free Open Source alternative, named Avahi, is so strong going that Apple is on their heels to keep up). You can see a video presentation here on Google Tech Talks.
I chose not to attempt to use the wireless setup with the Duet Receiver. With sufficient ports, it is by far recommended to use wired Ethernet for this - as well as for the device sending the sound files (which is the DiskStation in my case). That gives you a good and stable connection between the two.
Setting up the Duet Controller itself can prove to be a bit tricky. In my case I had to add the MAC address to the router, to allow it to connect wirelessly to my network. I also had to enter the WPA-PSK2 keyword into the Controller (you use the scroll wheel to find the letters and keys). It worked flawless, and I think this is what you have to expect when utilizing your Wireless system. Anyway, I seem to have some problems keeping the Duet Controller on the network consistently, in spite of the software being updated to the latest releases. This goes automatically when you have registered your product with Logitech online.
Generally much of the updating runs smooth and without user intervention. The exception being that Avahi/Zeroconf could make a huge difference for the Squeezeboxes and related software, to the point where no setup is required at all (with the exception that you'll always have to setup your router etc. and for wireless it is of course recommended to use strong encryption). It seems to me that the Duet Controller automatically determines and registers the correct kind of encryption.
Postscript: It seems that the qualms with IP config is solved with SqueezeCenter 7.3.3 and my latest firmware update of the Receiver, version 62. Yesterday the Receiver (the Player) ran IP xxx.104 and today xxx.100 straight, without problems. If this continues to run stable, then something about the DHCP handling has been fixed.
Hardware Upgrade
As mentioned with the initial Squeezebox Hardware evaluation, upgrading the power supply and potentially attaching another DAC seems to be a reasonable way to go. The first step is a new power supply, as it is suggested many places on the internet. I found several, like the one from Bolder Cables and another from Paul Hynes.
I also found a "black magic" upgrade from UK, mentioned many places on the internet: Audiocom International.
When I say "black magic" I refer to the Quantum Purifiers, of which I have not found any good explanation. To support this black magic further, Audiocom International also supplies "deep cryogenic treatment."
I also found Welborne Labs - this seems to be within the price range. I also found some criticism. My advice is to always continue searching on the internet to find and evaluate credibility of the product you are interested in. In spite of several sites claiming trouble with Welborne Labs I decided that I was willing to take a chance. I was also "weaponed" with a couple of alternatives, the first being that my VISA account allows me to draw the money back in case of disputes and the second action being the Internet Crime Complaint Center.
Search Google for "Welborne Labs fraud" - or check this:
I take it that even if I get the black box, the instruction papers and a few parts, it may be worth the money. Also, with the bad comments I decided that I'd be willing to wait as much as 6 weeks before reacting with any of my so-called weapons.
I ordered my Welborne Labs kit on the 6. of July. In the order I wrote "please provide estimate of delivery time." With the order came an email for confirmation. Several days later I wrote an email to a service email address in the confirmation email, asking for an estimate of delivery time + if possible a tracking number for the package. Welborne Labs replied on the 12. of July with tracking number. The package had been in the hands of USPS since 7. July, which means it was shipped the day after I ordered it.
The cost, 1078.09 DKK, was charged from my account.
For shipping I chose Global Priority Mail International, since it is the least expensive if insurance and tracking is required. It seems to me that tracking was not flawless, but I could see that the package had been put into the hands of USPS. Also signing up with USPS for email service didn't work, but I continued being able to follow the process. Here's the log as it eventually showed up:
Electronic Shipping Info Received, July 08, 2009
Acceptance, July 08, 2009, Stillwater, OK 74074
Arrival
International Dispatch, July 12, 2009, Foreign Center, Jersey City, NJ 099
Arrived Abroad, July 14, 2009, Denmark
Into Foreign Customs, July 14, Denmark
Out Of Foreign Customs, July 16, Denmark
Received Package, July 18, Denmark
 As I could see that the package was out of Foreign Customs I chased the
package at the local post office. Without a slip in the email I had to
hope for some flexibility at the post office, because I would go on
summer vacation the following Monday. I was successful that Saturday to
get the package at the post office.
As I could see that the package was out of Foreign Customs I chased the
package at the local post office. Without a slip in the email I had to
hope for some flexibility at the post office, because I would go on
summer vacation the following Monday. I was successful that Saturday to
get the package at the post office.
The Danish Value-Added-Tax was 261 DKK. Import tax (electronics from the US) was 124 DKK + 31 DKK VAT on shipping. A total of 416 DKK.
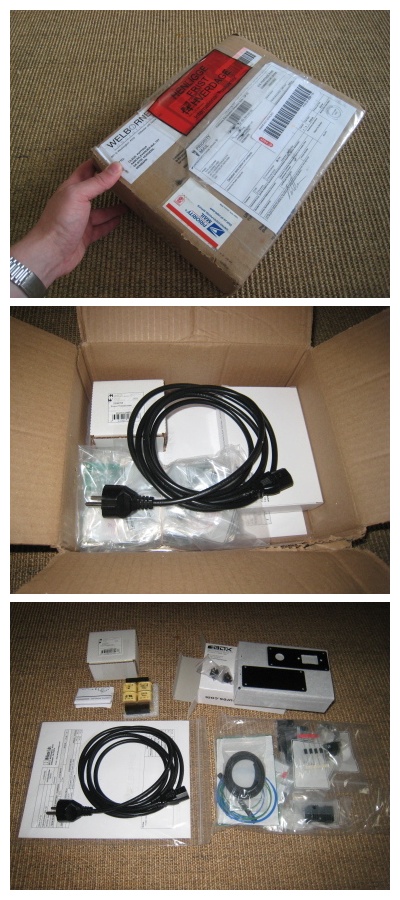
I was impressed to have received the package within two weeks, and the content of the package seemed to be OK. I ran through the list in the assembly manual and all parts seemed at a first glance to be there. A small difference is the listed 4700 uF / 16V capacitors, which were instead 3300 uF / 25V. I am OK with this. The pictures in the assembly manual looked like the printer did not have all colours available and they were a bit difficult to read.
You get an OK looking small box, with one end ready for mounting of the plugs and necessary screws. A transformer, with description how to connect it to 230 V. A large bag with various components of OK quality (among them a bunch of 3300 uF capacitors) and a decent quality glassfiber PCB. The package apparently includes everything, including a "hose" for the cables to the Squeezebox Receiver and solder tin. The package also includes assembly instruction which is several pages long and seems (at a first glance) pretty instructive with how to make/solder the plugs and all.
When you come to think about it, this is a package with good value, because buying a neat box alone and some connectors etc. could easily run into a similar amount. It seems to me that you do not pay for any type of hype. You pay for the hardware - at a fair cost.
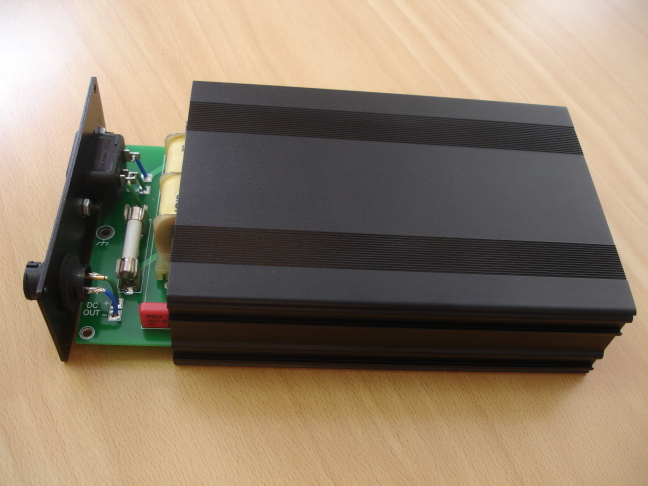
The end result is a neat power supply for a total around 1495 DKK.
The box is a nice matte black box with a handy size of 108 x 45 x 164 mm (including end plates) from www.boxenclosures.com (Illinois), named BEX Series 3 (B3-160). It came with front and rear end plates with holes for screws and two sets of screws, one with cross head and one with torx head. The cross head seemed coarse in the thread. I chose the torx head screws for better looks and they were able to thread into the aluminum case, making a nice tight fit, which I'd prefer not to unscrew again. The PCB slides nicely into the box on a shelf. To find out what was up and down on the box, I surfed to the Welborne Labs internet page to see their picture.
The end pieces seemed to be off center with the screw holes, but that is just a matter of what's up and down. Furthermore the back side of the plate for the connectors was scratched, but care had been taken that the front side had a good finish. In my opinion, this is OK.
The box also came with the type of stick-on feet that eventually seems to end all over the place, until they're stuck to the bottom of your shoe. Since I'm not planning to move the box around a lot, I'll give it a chance. They're from 3M and maybe the adhesive is better than what I'm used to.
The box is quite nice and I'd not hesitate to use a similar box for another project, see the Box Enclosures Catalogue for details. (I cannot provide you with a direct link because they keep rearranging their web catalogue, but pick Catalogue and then BEX Series 3 and you'll get there)
Building the power supply
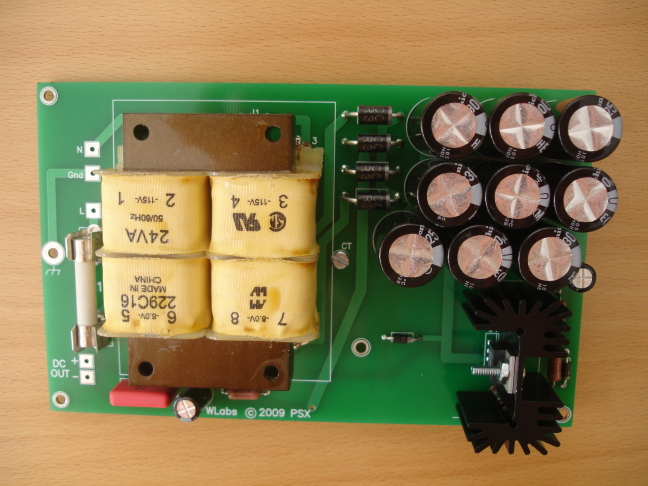
It took me 4 hours straight to build the complete set - about 3 hours for the box including testing and 1 hour for the cable. I followed the assembly manual very carefully. I did make two errors on the way.
First, I put one of the fuse holders in the wrong way - it is not like what I am used to, since orientation matters. I had to unsolder it - and the metal came loose from the PCB. After remounting it seems to be installed very well anyway - the double sided PCB is a breeze to work with. When mounting the fuse I found that I had to push the two holders apart a bit to make room for the fuse (again, I'm not used to this type of fuse holders). I recommend that you mount the fuse in the holder and then solder the two fuse holders to the PCB. This is not exactly what the assembly manual says.
My second error was to put jumper J1 on the top side of the PCB whereas the instruction says to put it at the bottom side. Although it would not matter for the function (and J1 can be on top next to the transformer) I chose to relocate it anyway. It is a bitch to get the solder out of the holes. I tried to use some of the supplied cable for the jumper, but the hole is too short - so I ended up using one of the cut-off component legs instead. At the end the result is good. If you had chosen a 115 Volt setup, then J2 and J3 are underneath the transformer and I guess it would be important to put the jumper on the underside of the PCB.
The assembly instructions say to cut the component legs off and be careful to make the legs short. This is truly important because if the legs are a bit long, they come close to the bottom of the box. For your safety, the distance from the component legs (when cut off) to the bottom of the box should be at least 6 mm (approximately 1/4 inch) to prevent high voltage jumping to the chassis.
I very much appreciate that each type of component was placed in its own little plastic bag and marked with the code you find silk screen printed onto the PCB and mentioned accordingly in the assembly manual.
The assembly manual suggests to test the PCB before soldering the connectors to the PCB. I didn't have proper equipment and did not feel like fooling around with 230 Volt, so I assembled the connectors and soldered it to the PCB, then tested it. I did not have a vario-trafo, so I just crossed my fingers, switched on the 230 Volt, with the PCB hanging 1/3 out of the box and observing the 9 Volt on the DC output. I used a Fluke 1-2-3 scope meter. It crawled up to 9.4 Volt. Maybe it goes down a bit when the power supply is loaded with the Squeezebox Receiver, but 9.4 Volt might also be OK. Welborne Labs states that the ripple is only 50 micro-Volt. I was not able to confirm this, but observed about 5 mV of noise. This is still very good and a colleague of mine assured me that measuring less than this would prove difficult. In fact, all cables in the area and e.g. the light armatures contribute to this noise. I would need a radio-dead room to prove this + maybe a better instrument.
After a couple of minutes I disconnected the 230 Volt mains cable and the PSU started discharging the capacitance (30,000 uF, which is more than what you find in many power amplifiers) into the resistor (R3). It also takes a minute or two. Then I dared to touch the equipment again.
I also measured the resistance in the DC cable, which came to basically zero ohm, that is, if I was measuring reliably with the Fluke 1-2-3 then there's max 0.1 ohm - probably it is less.
I am by no means good with electronics. In fact, this is the first time I've built something "solid state" that actually worked. My last project was a cable which takes stereo line output, and with two resistors joins it into a single output (going to my active subwoofer). I had to redo this cable a couple of times before it worked (there's such little space in them phono plugs). Clearly I knew to double-check my work before attempting to connect it anywhere. Previously I've tried other simple circuits without luck - it seems to me that anything with a transistor is outside my reach.
The fact that this kit worked first time is a cadeau to Welborne Labs for a well thought out kit as well as its very detailed assembly manual.
I only found one thing missing in the manual, which clearly shows that I am not an electronics engineer, and that is a description of what is + and - on a uni-polar capacitor. Working with loudspeakers I only know about bipolar capacitors (and they don't care about orientation). I checked the internet and found that there's a grey stripe marked on the side of the capacitor, which lists a number of 0 (zeros). Also the leg on this side is shorter - this is minus - so the longer leg is plus.
I was a bit insecure about another thing, which was the orientation of the diodes - it is clearly stated in the manual to look for this - but not exactly how. I figured that the silk screen print had a line at one end and that had to be aligned with the end of the diode marked with a grey color.
I enjoyed the double sided PCB - you solder for an additional second and the solder tin flows through the hole and position itself equally on both sides of the PCB, making a very strong joint that should last a lifetime. I personally found that a temperature of your solder iron around 375 deg Celcius was appropriate when using the solder tin that came with the kit.
The kit consists of all the materials you need, and none of the tools, which seems to me to be a fair split.
I am probably a very good test dummy for this type of kits. If you can solder, then I'd say you have a very high chance of success with this kit.
Audio Evaluation with the Power Supply
With the new power supply attached I went on to re-evaluate the sound quality of the Duet Receiver. I waited until the next day to fire up everything. My first impression was a large improvement, as would be one's expectation. I know that psycho-acoustics can play in, so I continued to play for a couple of hours. First of all I was not tired of listening to the equipment. As one guy states (on Welborne Labs page), the Duet is now a Hi-Fi grade piece of equipment.
Gone is almost all the "greyish" sound. Gone is the lack of bass control. Gone are the tinny and metallic sound passages. It is as if the Duet Receiver has control over the music.
I still found that on some music, which is very loud, when it pushes the last bit out of the Duet Receiver it doesn't sound good. A kind of digital hard sound, but it is nothing like the shrilling tinny and metallic sound previously observed.
The sound from the Duet Receiver with the new PSU can be a bit roaring in the midrange as if you hold up your hands in front of your mouth and make a funnel shape with your hands. This type of attenuation seems to be present in much (if not all) of the music, a "non-open" (i.e. closed) sound thanks to the fact that this is a second-grade component, not first grade, but in my opinion it now classifies as hi-fi.
It is a pleasure to finally have a Squeezebox Duet Receiver, which sounds better than my computers on-board AC97 chipset (which can sound a bit "fuzzy" as if there's a lot of noise and less precise, but which also makes it sound softer). The Duet Receiver with the new PSU sounds soft, when the music is soft, but never fuzzy - in fact it sounds very dynamic and precise.
I would not say that it is top notch, but I can live with it now, and probably won't touch it anymore. My next step would be to apply an external DAC such as an Accuphase plug-in card. I cannot do this until I upgrade my amplifier, so it will be a while.
If you're technically experienced, then my next step with the PSU would be to try different output voltages ... like a bit less, e.g. less than 9 Volt ... just to see if the Duet Receiver sounds better with less voltage input. My thought behind this is that it currently can sound a bit strained at high output - and maybe lowering the voltage will make the analog part sound better (a bit more relaxed). I do not have such capabilities, so this is left up to you.
I happen to have a Logitech diNovo Edge keyboard, which uses an 8 Volt power supply of similar type that came with the Duet Receiver, and which is capable of supplying 500 mA (similar to what the Duet Receiver PSU delivers). When I used the power supply from the keyboard I did not observe the "digital hard" sound, but the Welborne Labs PSU is still a clear preference for me. At the same time, all the logic seemed to work just fine at 8 Volt. The DAC is supplied with a regulated 5 Volt, so it doesn't harm to supply 8 Volt instead of 9 Volt to the device. There's still plenty to regulate the voltage down to 5 Volt. At least, during the period I tried this supply, I noticed no anomalies with the lower input voltage.
Turning down the volume on the Logitech Controller, sometimes as low as down to 80% of max, seems to get rid of the digital hard sound. When a high voltage (9.4 Volt) is supplied to the Duet Receiver, does something go into clipping before we hit the highest bits? There's room for tweaking here, but I am not the right person for this.
Another second step would be to send the Duet Receiver to the UK for an upgrade as with Audiocom International.
This is quite a price tag, though, and the modified Duet Receiver is becoming more expensive, to the point where you should maybe have bought a different device, for example the Linn Sneaky DS could be a candidate. Especially since the Squeezebox Duet does not support high-definition audio. I will be listening to my current setup before deciding whether to move in this direction.
A Few Notes on the Squeezebox Duet
After I wrote (almost) all of this text I found my way to forums.slimdevices.com and I can only recommend others to do the same. Here I have tried to pick together some loose ends.
Regarding high-definition audio (24 bit, 96 kHz), this is apparently outside the reach of the Duet Receiver. In systems where a PC is used for handling the music, SoX (Sound eXchange) can downsample (and upsample) your music files so that they can play through the Duet Receiver. For a NAS setup, the processing power and RAM will be inadequate. Instead, do a downsample conversion and save these files on your NAS system.
In my opinion, Logitech should work on a solution so that the system(s) can playback high-definition audio. This format is expected to be one of the formats that a hi-fi device can playback. The fact that the remote simply provides the message "Unsupported sample-rate" is not OK.
For what it is, I think the Duet combo is a bit pricey. It probably makes a lot of money for Logitech, I'd think, which I can accept. This counts both for the Receiver as well as the Controller. I think that the Duet combo would be more competitive if they increased the price by 50 % and gave the user a better remote (longer battery life, scratch resistant and smudge resistant coating on the screen, etc.) + better hardware in the Receiver (including a vastly better power supply regulation).
The Squeezebox Duet is not a real Hi-Fi piece of equipment. I may be a bit sharp here, since probably 80 % of the population (the average consumer) can live with it the way it is. The Duet combo is a low-cost lifestyle piece of equipment, and I guess that's where the money is for Logitech. A possibility would be a "Power Duet" alternative, where the user pays more, but also gets a better piece of Hi-Fi equipment.
During periods of listening I periodically noticed a very hazy sound, which I'd say is gone with the upgraded power supply. In the forum I have received serious objections to my stated improvements from the power supply upgrade, and to some extent backed up by facts. First and foremost the Duet Receiver is equipped with switch mode voltage converters (inside the box) which means that the output of the quiet linear and nicely fitted external power supply is chopped into a noisy lower voltage inside the Duet Receiver.
From an objective point of view, the only advantage left will be that the new power supply can maintain a more stable 9 Volt supply to the Receiver, but how variable is the current draw anyway, when talking about a small signal device? ... maybe periods of Wireless activity, or variable processing power can draw more or less current? I can only guess at the reasons for the observed improvements.
It is sad that the Duet Receiver is made in a way where serious attempts at improving the input is counterbalanced by very poor design choices inside the Receiver box. I stand by my observations, that the sound is improved with the new power supply, but I can understand that it could potentially have been much better. It gives me respect for the upgrades provided by Audiocom International, where among other things the SMD 7805 regulation is replaced with a discretely designed regulator and capacitors are upgraded to an OS-CON type.
You can observe the inside of the box (and the remote) by going to electricstuff.co.uk/sbduet.html. The bottom pictures show the inside of the Receiver box.
As I mentioned before, some people claim there's no difference to observe, whether I use the power supply that came with the Duet System or a fine power supply, like the Welborne Labs power supply. They have experimented with battery power and found no difference (others say the benefit of battery power is very slight and only observable if the switchers are lifted - meaning taken out of service and replaced with individual batteries). I beg to differ, there's a difference. The question always ends up being, is the upgrade worth the money? It depends on your expectations, requirements and what alternatives you have in mind. I recommend that you make your own assessment.
According to my observations, the hazy sound is gone and the grey / boring / uninspiring sound is almost gone and the setup seems more stable regarding to the quality of the sound output.
At some point I wondered if the sound quality issues could be due to flawed FLAC files, but I found that FLAC files contain a checksum (MD5) which can be tested by simply running FLAC.EXE at the command line with the -t option. The files were fine. I was also informed that the Squeezebox system would halt, if it was passed a corrupt file, so file integrity should be guaranteed OK all the way to the Receiver box..